> ## Documentation Index
> Fetch the complete documentation index at: https://lightship.mintlify.site/llms.txt
> Use this file to discover all available pages before exploring further.
# Configure Tenant-Scoped Trace Access
> Connect a shared ClickHouse trace table, create a tenant-scoped role, and verify the access boundary.
This guide connects an existing ClickHouse trace table, selects the fields that may be used in
access rules, creates a tenant-scoped role, assigns it to a user, and verifies the result.
## Before you begin
* Open the [hosted demo](https://demo.lightship.sh/) to follow this example.
* Sign in to LightShip as an administrator.
* Use a ClickHouse account with read-only access to the trace source.
* Identify the column or attribute that separates tenants. This guide uses `TenantId`.
## Starting state
Open **Traces**, select **Admin interface** in the role preview control, choose the appropriate time
range, and select **Apply**. The administrator should see the complete dataset before any role is
previewed.
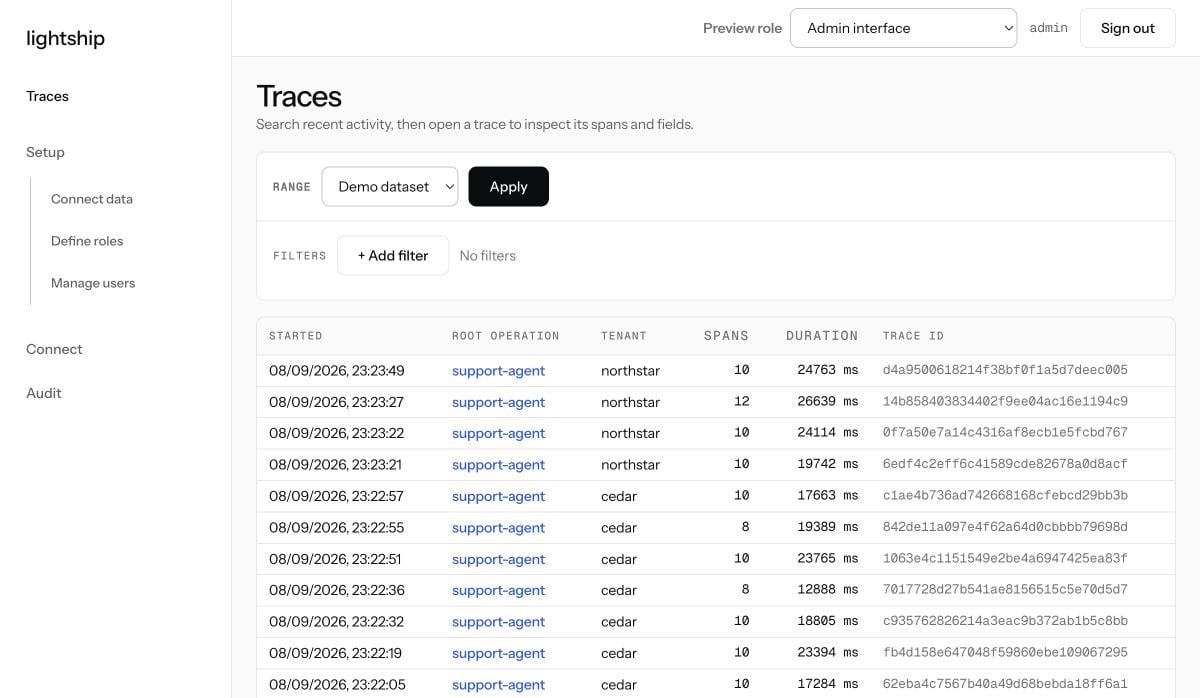 The tenant column contains both `cedar` and `northstar`.
## 1. Connect the trace table
Go to **Setup → Connect data**.
Select **Change** to discover or choose the table containing your traces.
Map the trace ID, timestamp, span ID, parent span ID, and span-name fields. Review the mapping
and save it.
The tenant column contains both `cedar` and `northstar`.
## 1. Connect the trace table
Go to **Setup → Connect data**.
Select **Change** to discover or choose the table containing your traces.
Map the trace ID, timestamp, span ID, parent span ID, and span-name fields. Review the mapping
and save it.
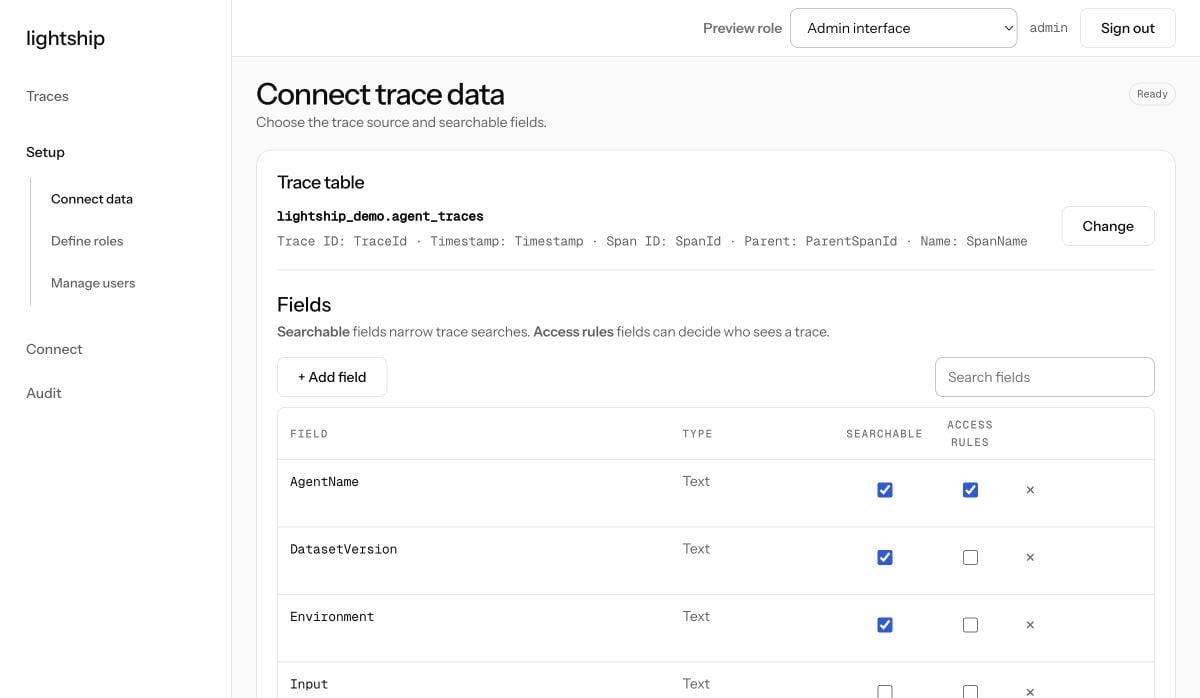 The example is bound to `lightship_demo.agent_traces`.
The page shows **Ready**, the selected table, and all five structural mappings.
LightShip is schema-flexible within ClickHouse today. It does not currently support arbitrary
database engines.
## 2. Configure searchable and policy-accessible fields
**Searchable** controls whether callers may filter their authorized traces by a field. **Access
rules** controls whether that field may be referenced by a role policy.
In **Connect data**, scroll to **Fields**. Add a field explicitly if a dynamic attribute was not
found during discovery.
Enable **Searchable** for fields users should be able to filter.
Enable **Access rules** only for fields trusted as authorization inputs. For this example,
enable both controls for `TenantId` and `AgentName`.
Leave tool payload fields disabled unless they are explicitly needed, then select **Save fields**.
The example is bound to `lightship_demo.agent_traces`.
The page shows **Ready**, the selected table, and all five structural mappings.
LightShip is schema-flexible within ClickHouse today. It does not currently support arbitrary
database engines.
## 2. Configure searchable and policy-accessible fields
**Searchable** controls whether callers may filter their authorized traces by a field. **Access
rules** controls whether that field may be referenced by a role policy.
In **Connect data**, scroll to **Fields**. Add a field explicitly if a dynamic attribute was not
found during discovery.
Enable **Searchable** for fields users should be able to filter.
Enable **Access rules** only for fields trusted as authorization inputs. For this example,
enable both controls for `TenantId` and `AgentName`.
Leave tool payload fields disabled unless they are explicitly needed, then select **Save fields**.
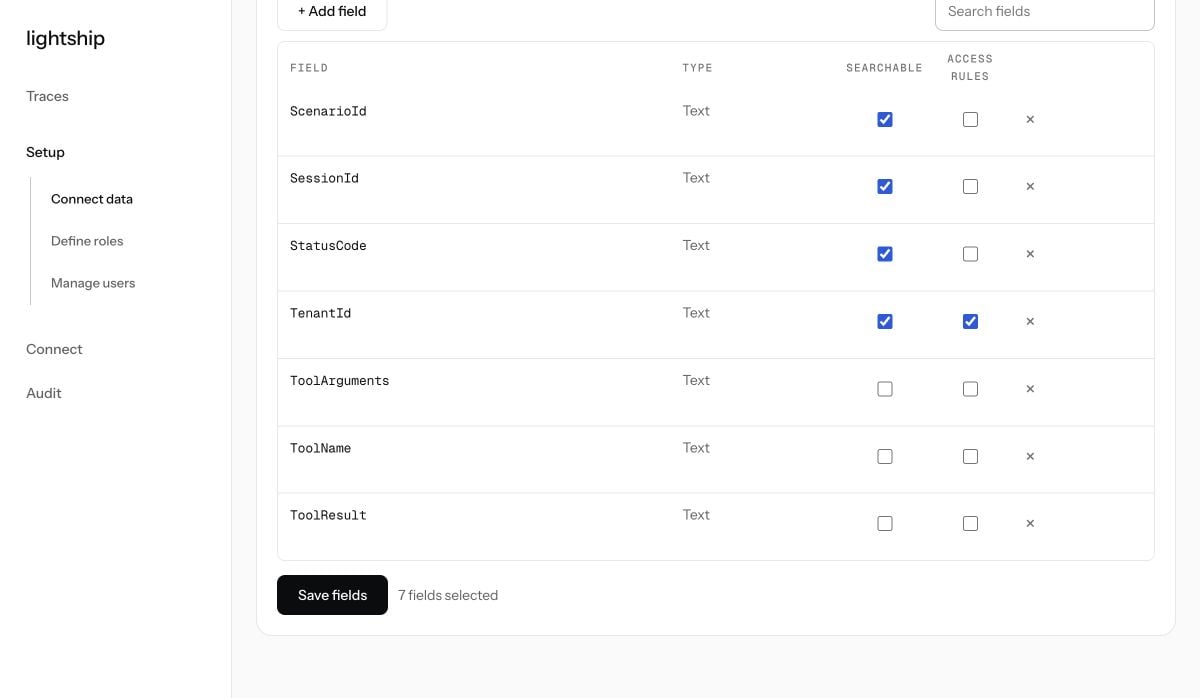 Policy authors can now reference `TenantId` and `AgentName`.
## 3. Create a tenant-scoped role
A role contains the policy LightShip evaluates for every trace request. This example permits Cedar
traces created by the support agent.
Open **Setup → Define roles**, select **+ New role**, and enter `cedar-account-manager`.
Add a condition where `TenantId` equals `cedar`.
Add a second condition where `AgentName` equals `support-agent`.
Save the role, then expand **View policy configuration**.
Policy authors can now reference `TenantId` and `AgentName`.
## 3. Create a tenant-scoped role
A role contains the policy LightShip evaluates for every trace request. This example permits Cedar
traces created by the support agent.
Open **Setup → Define roles**, select **+ New role**, and enter `cedar-account-manager`.
Add a condition where `TenantId` equals `cedar`.
Add a second condition where `AgentName` equals `support-agent`.
Save the role, then expand **View policy configuration**.
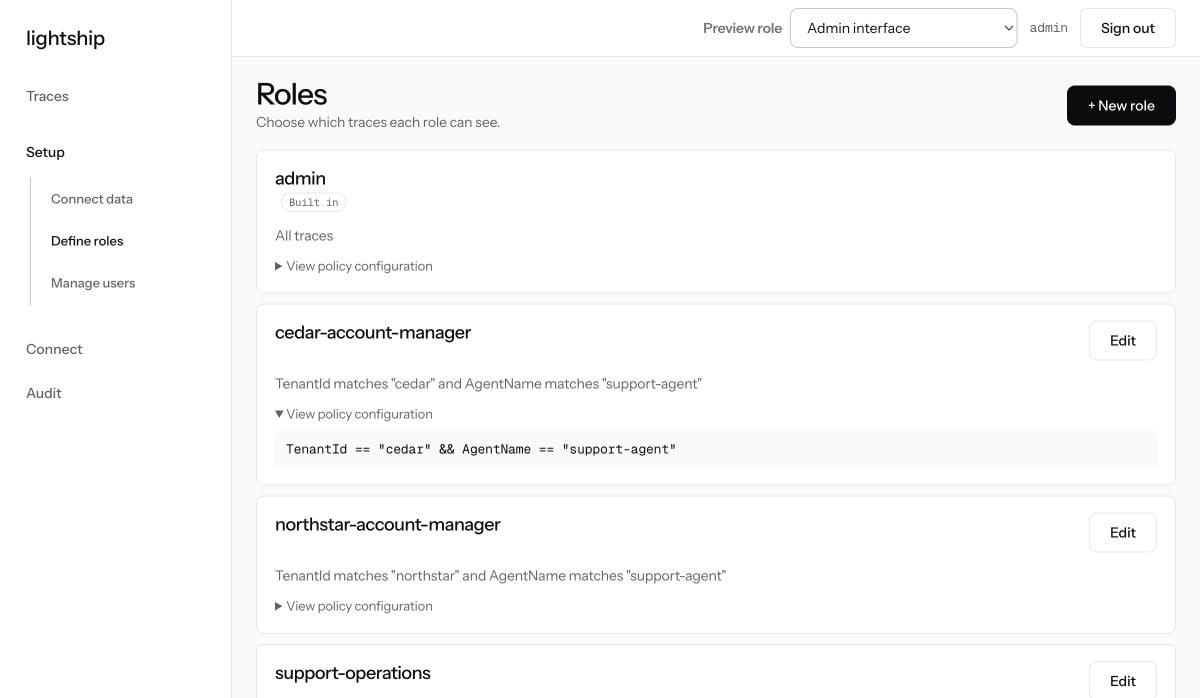 ```text theme={null}
TenantId == "cedar" && AgentName == "support-agent"
```
The role card summarizes both conditions and displays the compiled expression shown above.
### Reuse one role across tenants
For a reusable role, compare trace metadata with a string attribute attached to the signed-in user:
```text theme={null}
TenantId == user.tenant_id && AgentName == "support-agent"
```
If the tenant is stored in a Langfuse attribute map, use the configured map key:
```text theme={null}
SpanAttributes["langfuse.trace.metadata.tenant.id"] == user.tenant_id
```
For a tag-based rule, use exact array membership:
```text theme={null}
"agent:pii" in SpanArrayAttributes["langfuse.trace.tags"]
```
If a referenced user attribute is missing, LightShip denies access instead of widening it.
## 4. Assign the role and user attributes
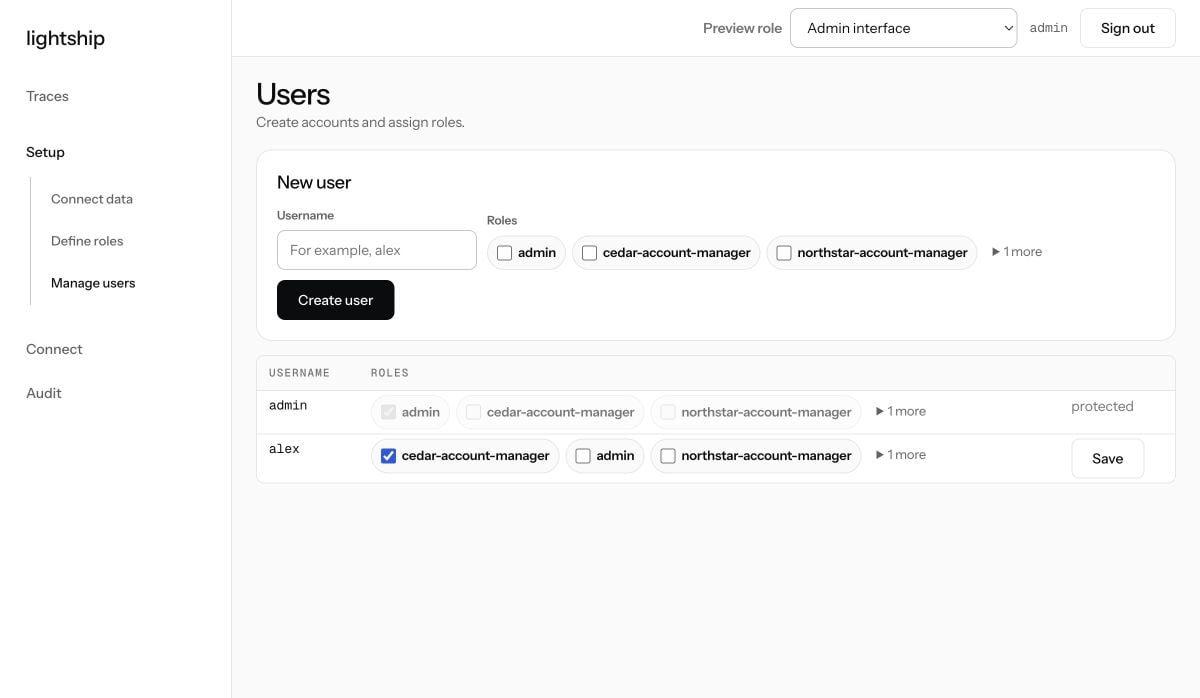
Open **Setup → Manage users**, then create a user or locate an existing one.
Select `cedar-account-manager`, then select **Save**.
If the policy uses `user.tenant_id`, set the attribute through the admin API.
```text theme={null}
TenantId == "cedar" && AgentName == "support-agent"
```
The role card summarizes both conditions and displays the compiled expression shown above.
### Reuse one role across tenants
For a reusable role, compare trace metadata with a string attribute attached to the signed-in user:
```text theme={null}
TenantId == user.tenant_id && AgentName == "support-agent"
```
If the tenant is stored in a Langfuse attribute map, use the configured map key:
```text theme={null}
SpanAttributes["langfuse.trace.metadata.tenant.id"] == user.tenant_id
```
For a tag-based rule, use exact array membership:
```text theme={null}
"agent:pii" in SpanArrayAttributes["langfuse.trace.tags"]
```
If a referenced user attribute is missing, LightShip denies access instead of widening it.
## 4. Assign the role and user attributes
Open **Setup → Manage users**, then create a user or locate an existing one.
Select `cedar-account-manager`, then select **Save**.
If the policy uses `user.tenant_id`, set the attribute through the admin API.
 ```bash theme={null}
curl -X PATCH https://your-lightship.example/users/alex/attributes \
-H "Authorization: Bearer $LIGHTSHIP_API_KEY" \
-H "Content-Type: application/json" \
-d '{"tenant_id": "cedar"}'
```
The role is assigned. A saved tenant attribute is immediately available as `user.tenant_id`.
Roles combine access. Assigning additional roles broadens access because the traces allowed by
every assigned role are combined.
## 5. Review the ClickHouse optimization report
Request `GET /schema/optimizations` or run the setup MCP tool `lightship_optimizations`. LightShip
returns advisory DDL and never changes ClickHouse itself.
```bash theme={null}
curl https://your-lightship.example/schema/optimizations \
-H "Authorization: Bearer $LIGHTSHIP_API_KEY"
```
For the hosted demo, the report found:
* `TenantId` is already the first field in the sorting key, so tenant comparisons are range scans.
* `AgentName` is not covered by the sorting key or a skip index, so LightShip recommends a
bloom-filter index.
```sql theme={null}
ALTER TABLE lightship_demo.agent_traces
ADD INDEX idx_ls_agentname AgentName
TYPE bloom_filter(0.01) GRANULARITY 1;
ALTER TABLE lightship_demo.agent_traces
MATERIALIZE INDEX idx_ls_agentname;
```
The hosted table's sorting key is `TenantId, Timestamp, TraceId, SpanId`. LightShip generated the
recommendation above on September 9, 2026; no DDL was executed. Review and schedule index
materialization like any other production schema change.
## 6. Verify the policy with role preview
Test an allowed trace and a trace outside the role's tenant before distributing credentials.
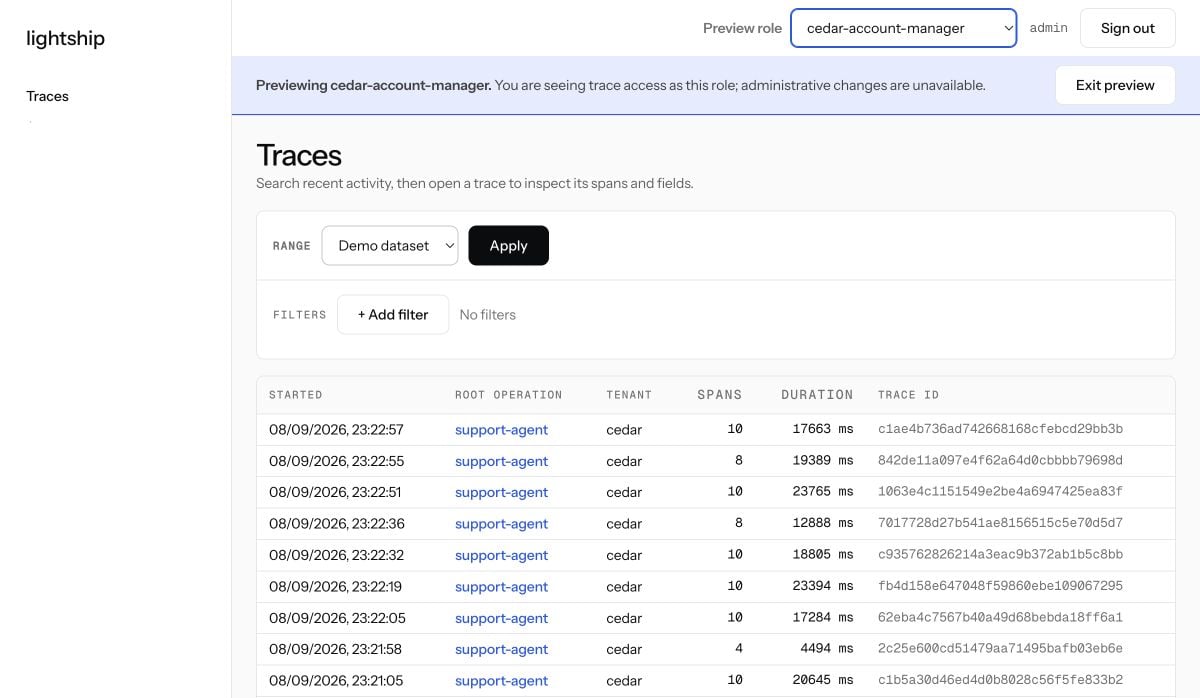
Open **Traces** and choose `cedar-account-manager` from **Preview role**.
Apply the demo time range and confirm every visible row has tenant `cedar`.
```bash theme={null}
curl -X PATCH https://your-lightship.example/users/alex/attributes \
-H "Authorization: Bearer $LIGHTSHIP_API_KEY" \
-H "Content-Type: application/json" \
-d '{"tenant_id": "cedar"}'
```
The role is assigned. A saved tenant attribute is immediately available as `user.tenant_id`.
Roles combine access. Assigning additional roles broadens access because the traces allowed by
every assigned role are combined.
## 5. Review the ClickHouse optimization report
Request `GET /schema/optimizations` or run the setup MCP tool `lightship_optimizations`. LightShip
returns advisory DDL and never changes ClickHouse itself.
```bash theme={null}
curl https://your-lightship.example/schema/optimizations \
-H "Authorization: Bearer $LIGHTSHIP_API_KEY"
```
For the hosted demo, the report found:
* `TenantId` is already the first field in the sorting key, so tenant comparisons are range scans.
* `AgentName` is not covered by the sorting key or a skip index, so LightShip recommends a
bloom-filter index.
```sql theme={null}
ALTER TABLE lightship_demo.agent_traces
ADD INDEX idx_ls_agentname AgentName
TYPE bloom_filter(0.01) GRANULARITY 1;
ALTER TABLE lightship_demo.agent_traces
MATERIALIZE INDEX idx_ls_agentname;
```
The hosted table's sorting key is `TenantId, Timestamp, TraceId, SpanId`. LightShip generated the
recommendation above on September 9, 2026; no DDL was executed. Review and schedule index
materialization like any other production schema change.
## 6. Verify the policy with role preview
Test an allowed trace and a trace outside the role's tenant before distributing credentials.
Open **Traces** and choose `cedar-account-manager` from **Preview role**.
Apply the demo time range and confirm every visible row has tenant `cedar`.
 Next, verify that knowing a trace ID does not bypass the policy.
Select **+ Add filter**, choose `TraceId` and the `==` operator, and enter the ID of a known
Northstar trace.
Select **Apply**.
Next, verify that knowing a trace ID does not bypass the policy.
Select **+ Add filter**, choose `TraceId` and the `==` operator, and enter the ID of a known
Northstar trace.
Select **Apply**.
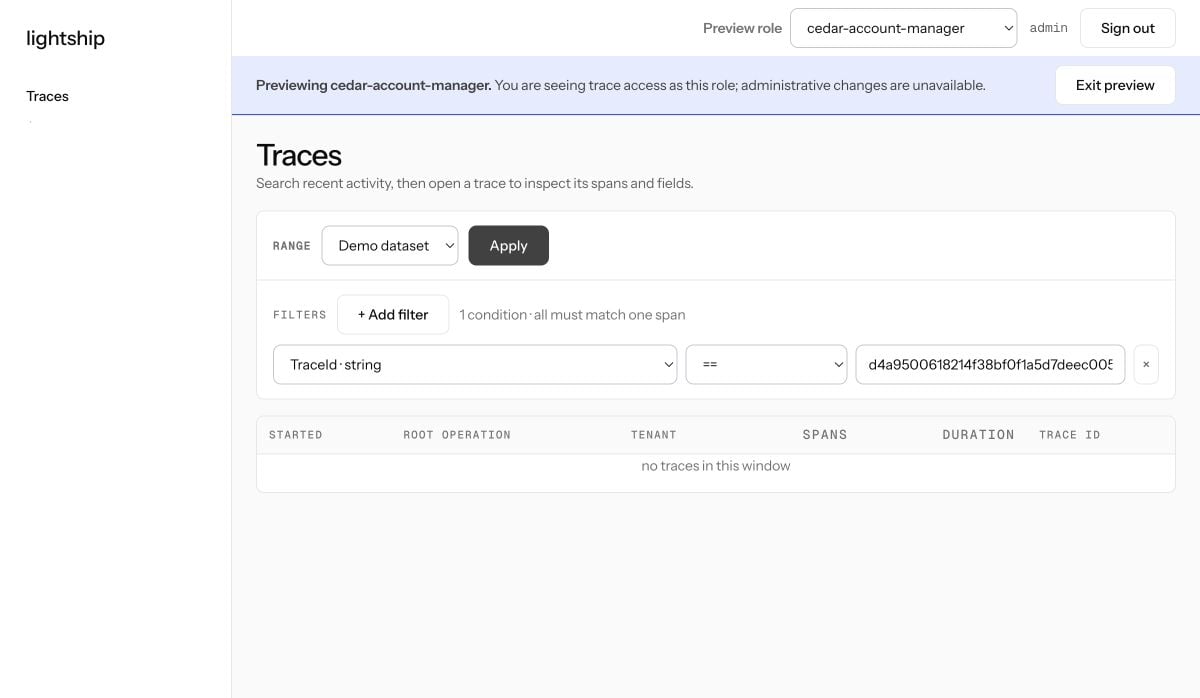 The lookup returns no traces. An unauthorized trace and a nonexistent trace produce the same
result.
The same policy governs access across all services and surfaces: web, REST, and MCP.
## 7. Investigate the demo traces with MCP
Follow the [MCP connection guide](/use/mcp) to connect Codex or Claude, then begin with the question
a product or operations owner would naturally ask:
> We’ve been hearing that refunds aren’t going smoothly. Can you look across our support-agent
> sessions from September 8 and tell me what seems to be going wrong and how widespread it is?
Then drill into the evidence:
> Show me one session that makes the stale-policy problem really clear. Give me the session ID and
> then briefly explain what the customer asked, what policy the agent used, and what the backend
> decided.
> Give me one representative session for the refund-service problem too. Was the refund known to
> have failed, or was the outcome uncertain?
Finally, turn the investigation into an operational question:
> Give me all customers for whom the refund service timed out and we did NOT escalate it to the
> human, we need to reach out to them.
These prompts exercise aggregation across the full trace population, evidence-backed drill-down,
and grounded handling of missing data. The final answer should explain that this demo contains order
identifiers but no customer names or contact details instead of inventing them.
## Current behaviour
If a caller is authorized for a trace, LightShip returns the complete trace. Field-level redaction
and content classification are not available today.
Before production rollout, confirm that trace-level authorization is sufficient for the data in
scope and avoid exposing payload fields unless required.
We are looking for feedback from teams operating multi-tenant agent traces. Tell us which
capabilities would make LightShip work better in your environment—identity-provider integration,
richer policy controls, redaction, or something else.
The lookup returns no traces. An unauthorized trace and a nonexistent trace produce the same
result.
The same policy governs access across all services and surfaces: web, REST, and MCP.
## 7. Investigate the demo traces with MCP
Follow the [MCP connection guide](/use/mcp) to connect Codex or Claude, then begin with the question
a product or operations owner would naturally ask:
> We’ve been hearing that refunds aren’t going smoothly. Can you look across our support-agent
> sessions from September 8 and tell me what seems to be going wrong and how widespread it is?
Then drill into the evidence:
> Show me one session that makes the stale-policy problem really clear. Give me the session ID and
> then briefly explain what the customer asked, what policy the agent used, and what the backend
> decided.
> Give me one representative session for the refund-service problem too. Was the refund known to
> have failed, or was the outcome uncertain?
Finally, turn the investigation into an operational question:
> Give me all customers for whom the refund service timed out and we did NOT escalate it to the
> human, we need to reach out to them.
These prompts exercise aggregation across the full trace population, evidence-backed drill-down,
and grounded handling of missing data. The final answer should explain that this demo contains order
identifiers but no customer names or contact details instead of inventing them.
## Current behaviour
If a caller is authorized for a trace, LightShip returns the complete trace. Field-level redaction
and content classification are not available today.
Before production rollout, confirm that trace-level authorization is sufficient for the data in
scope and avoid exposing payload fields unless required.
We are looking for feedback from teams operating multi-tenant agent traces. Tell us which
capabilities would make LightShip work better in your environment—identity-provider integration,
richer policy controls, redaction, or something else.